.jpg)
![]()
.jpg)
![]()
I have a special project with tutorial to share with you. I used the beautiful Shoreline Treasures papers to make this calendar cube. The cube measures 3 1/4″ square and has 12 slots – one for each month – 3 on each side, with small shelves inside to hold the calendar inserts in place. The slots decrease in height incrementally by 1/4″ going clockwise. Not only can you fill these slots with calendar months, but you can also fill them with recipes, photos, inspirational messages, or schedules. My inserts have a monthly calendar on one side and a beautiful maritime image from the collection on the other side so that when the insert is removed and placed in position at the top of the cube, both sides of the insert can be seen.
1. Cut 2 pieces of cardstock each measuring 6 5/8″ x 7″. Take each piece and score at 1/8″ and 3 3/8″ down the shorter side. Also lightly score at 1/4″ and 6 1/2″ as these light score lines will be vertical guide marks for when cutting slots. Turn and score at 1/2″ and 3 3/4″ down the longer side. Score also at 4 1/4″ and then cut out one square along this score line as shown below forming tabs on the 1/2″ remaining piece as you cut out the square portion. Between the 1/2″ and 3 3/4″ score lines on the longer side, lightly score every 1/4″ as shown on the template below as these 12 light score marks will be your guides when cutting the slots. You will need to make sure to cut all the tabs as shown below.
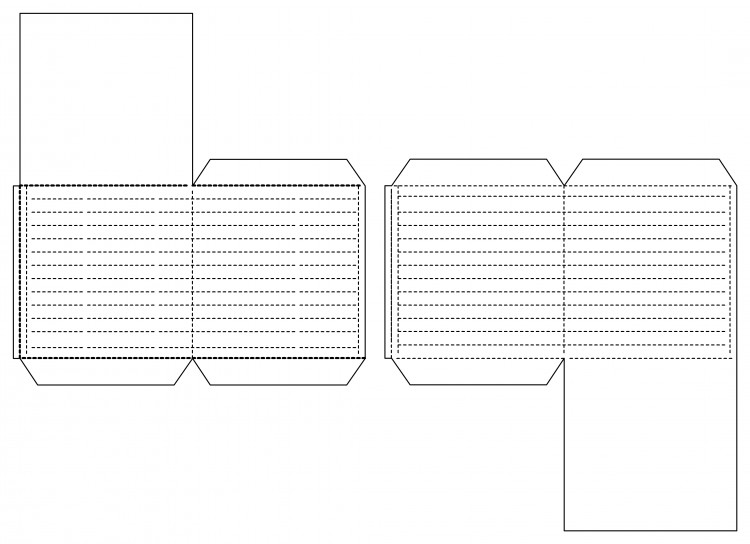
![]()
2. Orient your pieces as shown on the template below and starting at the top left, begin cutting 3″ slots along the horizontal score lines using the lightly scored vertical lines on the sides as your guides for where to start the cut. Once cut, go 1/4″ down on the next square to the right and cut another 3″ slot. Continue to repeat this pattern on each of the 4 sides going 1/4″ down each time. Your cuts should look like the below template when finished:

![]()
3. Fold along score lines to form and adhere the top and bottom flaps to the tabs.
![]()
4. Cut 11 rectangles measuring 1 3/4″ x 3 1/8″. Score at 1/4″ along the long side and 1/8″ along the short side. Cut out the little corner where the score lines meet. Six of the rectangles will need to be folded in one direction along the score lines while the other five will need to be folded in the opposite direction to work each side of the cube.
![]()
5. Starting at the top of the cube, adhere one of the rectangles just below the top slot with the shorter side abutting and adhered against the other wall. The glued tabs should be pointing down. Repeat for the top slot on the other side. Go one slot lower each time making sure the shelves are glued-on straight. The very bottom slot will not need a shelf since the cube floor is so close.
![]()
![]()
![]()
6. Now carefully bring the 2 parts of the cubs together making sure the shelves are in order from top to bottom. Adhere the cube sides together and then adhere the top and bottom.
![]()
7. Cover and decorate with beautiful Pion Design papers
8. Make 12 inserts for the cube slots measuring about 2 7/8″ x 3 1/2″.
Pion products:
Shoreline Treasures ~ Images PD4611
Shoreline Treasures ~ Borders PD4610
by DT ~ Tara
WOUW this is sooooooooooooooo clever and soooooooo beautiful Tara. Thanks soooo very much for all the instructions for it too, it´s really awesome, and this is definitely one, I´m going to try as soon as I´m done with my ongoing projects, as it´s soooo fabulous and looks sooo gorgeous too.
Thanks sooo much again and have a wonderful week-end ahead here now.
Superb idea and so perfecly constructed. It looks wonderful. Nicola x
wow, this is amazing!!!
wow wow woooow!!! amazing!!!
This project is absolutely stunning!! I’ve just found this website today and I’m amazed at the beautiful papers and projects. Thank you for sharing your talent!
WOW!!!! This is gorgeous and so different.
Did you cut have a cut file for the cube ?
I love this calender cube. Is it possible to get in another cutting format such as dxf, gsd, or svg? Make the Cut is not working for me.
Hi Inez, I only have the cutting file available in WPC format and I don’t know how to convert it to another format. My understanding though is that there are ways to convert this file format to whichever one you need, and so you may try doing an internet search to find out how this is done. Best wishes! Tara